- Home
- Users & Science
- Find a beamline
- Structure of materials
- ID22 - High resolution powder diffraction beamline
- Science at ID22
- Examples: Residual Strain
- Methods for engineering materials
Methods for engineering materials
Characterisation of residual strain in engineering materials using diffraction methods
Residual strains are introduced into engineering materials and components through their processing and their characterization is critical for the understanding of the structural integrity of such components. The residual stress state can be manipulated by thermal and mechanical processes to improve the mechanical behaviour of materials.
The research focuses on mechanical surface treatments which aim to increase the resistance of a material to fatigue (cyclic loading) cracking. The beneficial effects of mechanical surface treatments arise through the plastic deformation of the near-surface layers of material, which generate favourable compressive residual stresses (and strains). These residual strains can be determined from the accurate measurement of the lattice spacing of single Bragg reflections or from the refinement of the lattice parameter from a complete diffraction pattern. The plastic work induced by processing can be assessed in the first instance from the broadening of the diffraction peak and in the second instance studying the relative shifts of several lattice reflections to each other.
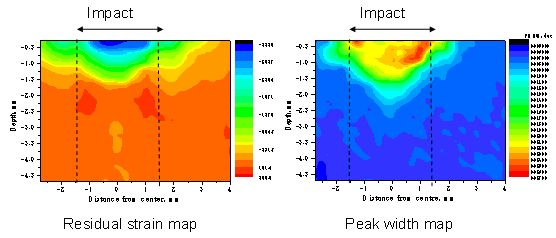
This research has been conducted primarily on two types of mechanical surface treatments; laser shock peening and ultrasonic surface treatment. The residual stresses and peak broadening of the former have been studied when applied to titanium alloys which are extensively used for the compressor section of aero engines. Studies of laser shock peened titanium on ID31 include characterisation of the radial residual strain distribution generated by two laser shock peening systems [1] in collaboration with Professor K. Akita, Musashi Institute of Technology, Japan. The residual strains and peak widths were mapped around single laser shock peening impact event in two dimensions in order to validate numerical models of the process. Such models are limited by the lack of data of the deformation of these alloys under shock loading conditions. The residual strain map reveals the distribution of favourable compressive residual strains generated by a single impact (blue) and the location of the deleterious tensile residual strains, which can act as a source for crack initiation. The map of peak widths exhibited significant broadening at the edges of the impact (red), which corresponded well with high plastic shear strain predicted by the numerical model.

Figure 1. Maps of the two-dimensional residual strain and peak width distribution around a single laser shock peening impact in Ti-6Al-4V alloy, measured on ID31.
Studies of residual strain and peak broadening on several crystallographic reflections and comparison with monochromatic and time-of-flight neutron diffraction data have been made in order to understand which reflection best describes the bulk residual stress. Because of the analyzer crystal optics on ID31, the near surface residual strains can be measured without geometrically induced spurious strains which dominated the neutron diffraction measurements. The fast acquisition time allowed the study of the spatial uniformity of the peening residual stresses, by mapping the residual strain depth distribution as a function of position along the treated surface. Measurements showed that the maximum variation is 500με, which was located at the very near surface. The stability of the residual stress state generated by laser shock peening under compressive fatigue (cyclic) loading has been studied in collaboration with P. Frankel, University of Manchester UK. This study was performed to assess the long term benefits to the structural integrity of treated components during mechanical loading. Exploiting the analyzer crystal optics, residual strain distributions of laser-shock peened aero engine airfoils have been characterised. Such measurements incur significant errors from spurious strains on instruments without analyzer crystals, owing to displacements of the centre of gravity of the scattered intensity from the centre of the diffractometer.
These measurements for the first time revealed the strain distribution and how it is locally altered when the leading edge is dented by foreign object damage (FOD), which commonly occurs on aero engine fan and compressor blades. This work led to further studies by Frankel into FOD damage of non laser shock peened blades and an industrial experiment for Rolls-Royce (via University of Manchester) to determine residual stresses in simulated laser shock peened airfoils. Finally the work on laser shock peened titanium alloys includes the VAMAS project, which aims to standardize the determination of residual stress using synchrotron diffraction, similar to that already publishes for neutron diffraction. Other studies of mechanical surface treatments include ultrasonic impact treatment which is attracting widespread interest in industry to improve the damage tolerance of structures, particular large steel structures. The treatments has been studied in the aerospace aluminium alloy AA2024 and stainless steel in collaboration with the University of Manchester and Sheffield Hallum University, UK. In addition characterisation of the residual stresses generated by shot peening and deep rolling in aerospace aluminium alloys, and their stability under mechanical loads have been conducted in collaboration with the D. Asquith, University of Sheffield, UK.
The second aspect of research is the study of matrix chemistry of dilute Zr alloys characterised by detecting small changes of the lattice spacing from full diffraction pattern refinements [2] in collaboration with the Materials Performance Centre, University of Manchester, UK (M. Ivermark, Dr M. Preuss and Dr J Robson). Zirconium alloys are industrially important owing to their application by the nuclear industry as fuel cladding material in light water reactors (LWR) because of their low neutron absorption, sufficient high temperature strength and excellent corrosion properties at 350°C in steam environment. Zr alloy research has revealed that even the smallest variations of alloying elements have a pronounced effect on the high temperature steam corrosion properties and that in terms of understanding surface oxide formation, the barrier to corrosion, the characterisation of matrix chemistry is of significant importance.
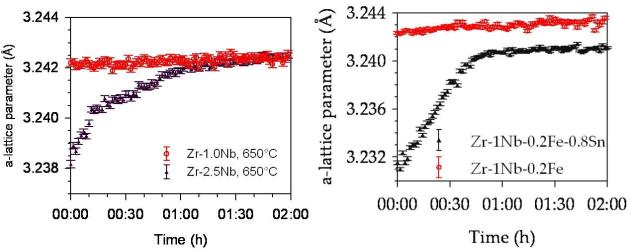
Full diffraction patterns were recorded from small samples machined from larger castings in the standard powder diffraction set-up. The lattice spacing of the HCP Zr-α has been characterised as a function of solute concentrations and following in-situ aging at elevated temperatures. These results are extremely interesting since for the first time it is now possible to identify the time it takes before the matrix chemistry has reached a steady state condition and any further precipitation coarsening does not affect the matrix chemistry. This project will continue by studying more complex ternary and quaternary alloys, and a commercial alloy, to understand the influence of individual alloying elements on the solubility of the important solute element Nb in the Zr-α phase and how the matrix chemistry of more complex alloys is a function of aging temperature and time. The experiment demonstrated that this novel technique is effective at characterising matrix chemistry and the kinetics of precipitation of second phase precipitates (SPP) in these alloys.

Figure 2: Changes of the a lattice parameter are plotted as a function of time during aging at 650°C for a) two Zr-Nb alloys and b) for a ternary and quaternary alloy [2]
References:
[1] K. Akita, M. Kuroda, A.D. Evans, P.J. Withers, Dynamic finite element analysis and synchrotron X-ray measurements of residual stresses inducted by laser peening, Proceedings of the symposium on X-ray studies on mechanical behaviour of materials, Vol. 41 (2006) 25-30.
[2] A.D Evans, M. Ivermark, M. Preuss, J. Robson, Characterisation of matrix chemistry and precipitation distribution in zirconium alloys, ESRF experimental report MA-325.


