- Home
- Users & Science
- Scientific Documentation
- ESRF Highlights
- ESRF Highlights 2004
- Materials Science
- Watching the Growth of Bulk Grains during Recrystallisation of Deformed Metals
Watching the Growth of Bulk Grains during Recrystallisation of Deformed Metals
When a material is deformed plastically, excess line defects (dislocations) and some excess point defects are introduced into the material. The density of these excess defects can be reduced by means of annealing. One of the basic processes taking place during annealing is recrystallisation [1]. Although resembling crystallisation, recrystallisaton is a very different process. The differences relate to the fact that recrystallisation occurs in an already solid crystalline material, and thus the atoms have to move from one lattice arrangement in the deformed material into a new and more perfect one.
 |
|
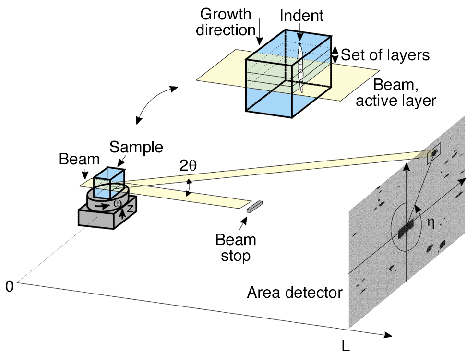
Fig. 36: Sketch of the experimental setup. Co-ordinate system (x,y,z) and angles ( |
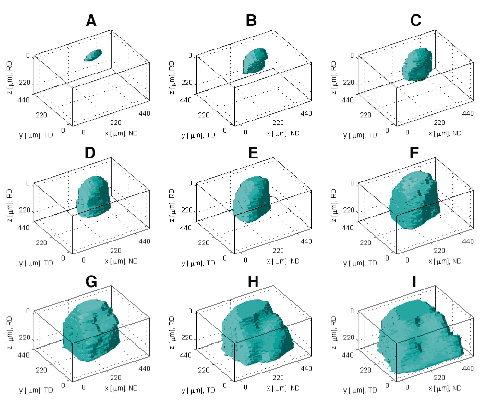
The 3DXRD microscope [2] situated at beamline ID11, which has been developed in a collaboration between the ESRF and Risø National Laboratory, facilitates non-destructive observations of structural changes in the bulk of materials. Recently, the growth of individual recrystallising grains have been filmed in situ as a function of annealing time in the bulk of deformed Al single crystals. A planar beam shape with dimensions 5 µm vertically and 600 µm horizontally was used to record a "snapshot", i.e. a stack of cross sections constituting the full three dimensional shape of the individual recrystallising grain (see schematic view of the experimental setup in Figure 36). By repeating this procedure during an annealing period, a four dimensional measurement, i.e. three spatial dimensions and one time dimension, of the recrystallising grain was obtained, as shown in Figure 37. All the grains measured so far exhibited irregular movements contradicting the assumption of smooth growth in the classical models of recrystallisation for the chosen sample system. The information content provided in this new type of measurement, given by the position of individual grain boundary segments, the crystallographic orientation of the recrystallising grain and the average orientation of the surrounding deformed microstructure, makes it possible to probe the mechanisms of recrystallisation locally.
 |
|
Fig. 37: Storyboard of the expansion of the grain in the sample reference system. In total 73 "snapshots" were taken during 30 hours of annealing at temperatures in the range 280°C to 310°C. The storyboard contain "snapshots" 1, 12, 17, 27, 39, 49, 59, 72 and 73 shown in figures A to I. At different times, different parts of the grain were leading in the expansion. |
References
[1] E.g. "Recrystallisation Fundamental Aspects and Relation to Deformation Microstructure", Proc. 21st Risø Int. Symp. on Materials Science, Edited by N. Hansen et al., Risø, Denmark (2000).
[2] H.F. Poulsen et al., J. Synchrotron Rad. 4,147-154 (1997).
Principal Publication and Authors
S. Schmidt (a), S.F. Nielsen (a), C. Gundlach (a), L. Margulies (a,b), X. Huang (a), D. Juul Jensen (a), Science 305, 229232 (2004).
(a) Center For Fundamental Research: Metal Structures in Four Dimensions, Risø National Laboratory, Roskilde (Denmark)
(b) ESRF


