- Home
- Users & Science
- Scientific Documentation
- ESRF Highlights
- ESRF Highlights 2003
- Materials Science
- First Results from the FaME38 Project
First Results from the FaME38 Project
FaME38 is the joint ESRF and ILL support Facility for Materials Engineering. It provides, in close collaboration with beamline staff, the additional support that most Engineers require to enable them to perform materials engineering experiments at the ESRF and the ILL.
The initial emphasis, since the inauguration of the FaME38 laboratory in November 2002, has been in the strain/stress measurement field but support is also available for materials engineering experiments generally. The laboratory provides off-line experiment preparation, advanced metrology tools and data analysis facilities. Particular objectives are to improve the reliability, accuracy and efficiency of engineering experiments. Engineering samples (such as railway rails or replacement hip implants) can have complex shapes, or can differ significantly from their design shape due to distortion (as is often the case in welds) or due to wear (as occurs during service). An experiment may involve measuring strain in three or more directions as a function of position within a component so that the stress field may be determined. To map the strains in such components it is necessary first of all to know precisely their shape, their location and orientation, and then to manipulate them relative to the 'gauge volume' defined by the incident beam and detector optics. The international VAMAS TWA20 project, that develops standards for measuring residual stresses using neutrons and synchrotron X-rays, has shown that, although strain measurement has been in general satisfactory, sample positioning has often been inadequate [1].
 |
|
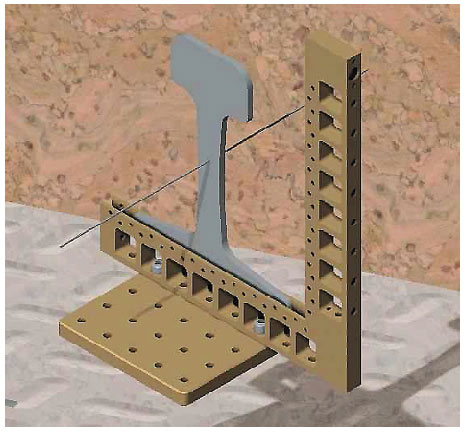
Fig. 69: Standard VAMAS recommended base-plate system with L-shaped mount (and illustrative sample) that provides rapid and precise sample positioning. |
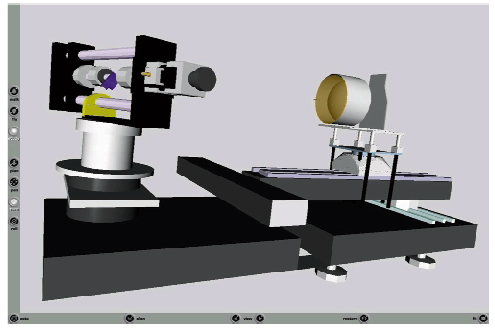
A disproportionate amount of beamtime is also often spent on the beamline, mounting and aligning samples and in generating the appropriate scanning macros. The FaME38 philosophy is that this type of work should be performed off-line wherever possible. It is the same philosophy as that adopted by airlines that train their pilots, and test the limits of their aircraft, 'off-line' using flight simulators prior to flying their passengers from major airports. In the FaME38 metrology laboratory a Co-ordinate Measuring Machine (CMM) is used to determine sample shapes and location relative to a standard mount and base-plate (Figure 69) to an accuracy of ±2 micrometres. Samples can then be mounted in minutes to ~ ±0.01mm on a matching base-plate on the beamline. A mechanical simulator and web-based 'virtual instruments' are being developed, using CAD knowledge of the beamlines and sample information from the CMM, on which mounting systems, scanning matrices, and collision avoidance, can be developed and assured off-line (Figure 70).
 |
|
Fig. 70: A web-based 'virtual instrument'. The illustration shows a sample mounted in a test rig on ID11. All the components can be manipulated remotely to provide an accurate scan simulation. |
In combination, the gains in reliability, positioning, collision avoidance, setting-up time, counting time, Local Contact time, scan optimisation, near-on-line data processing and the visualisation of results, are considerable and users are exploiting the benefits. The enhancements will lead not only to substantial improvements in efficiency and data quality for existing users but to an increasing user base that will include many more academic and industrial engineers who until now have not considered using synchrotron radiation as an analytical tool.
For further information contact the FaME38 team.
Reference
[1] Technology Trends Assessment ISO/TTA 3:2001.
Author
FaME38
ESRF-ILL


