- Home
- Users & Science
- Scientific Documentation
- ESRF Highlights
- ESRF Highlights 2006
- X-ray Imaging and Optics
- Status of the ESRF long trace profiler
Status of the ESRF long trace profiler
The ESRF mirror metrology laboratory houses a home made Long Trace Profiler (LTP) and several other commercial interferometers. It is basically a double pencil slope-measuring interferometer, able to give the slope error, radius of curvature, and through integration, the height profile for optical surfaces larger than one metre in length. The repeatability of the ESRF LTP is better than 0.05 µrad. To characterise its absolute precision, the ESRF metrology lab has been involved in two round-robin campaigns one at a European level and the second with the APS and SPring-8. These campaigns consist of an inter-comparison of standard X-ray mirrors measured with various LTPs and also with the BESSY N.O.M (Nanometre Optical component Measuring Machine).
The agreement for flat mirrors is better than 0.1 µrad even for the state-of-the-art flat mirror (100 mm long) provided by the Osaka University whose figure error, measured by micro-stitching interferometry [1], is 0.4 nm rms. For spherical mirrors, the radius of curvature (down to 44 m) conformity is better than 0.3% and the residual slope profiles agree impressively well - in particular between BESSY and the ESRF, although the BESSY measurement is done with an autocollimator sensor (Figure 144).
 |
|
Fig. 144: spherical mirror (R = 1.3 km) residual slopes after best sphere subtraction. |
The new generation of X-ray optics used in elliptical KB configuration, which are required for nanofocussing, is challenging for LTP metrology due to their strong slope variations. Another issue is the new concept of fixed curvature optics where LTP metrology is mandatory for deterministic surface correction. Efforts to improve the LTP performance have been made with these goals in mind. New measurement procedures have been developed to considerably reduce systematic errors induced by internal LTP optical elements. They consist of averaging profiles at various tilt angles and after a mirror rotation by 180 degrees.
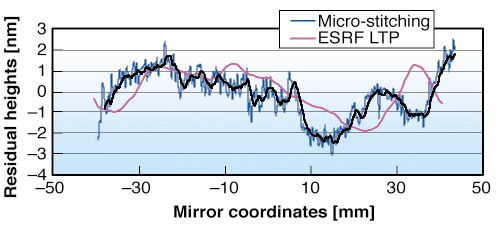
The slope registration in respect to the mirror edges has also been improved to reach a repeatability better than 5 µm. Finally new mathematical tools have been implemented resulting in a new approach to the slope error calculation, where the ideal parameters of incidence angle and focussing distance are evaluated in order to minimise the residual slope errors of the mirror. Tests were carried out on an elliptical KB focussing mirror made by elastic emission machining at the Osaka University and characterised by micro-stitching interferometry presenting a residual shape error below 1 nm rms.
 |
|
Fig. 145: OSAKA mirror residual heights after best ellipse subtraction. |
With the given elliptical parameters (![]() = 3.26 mrad and q = 128 mm for the focussing distance) the residual errors measured with LTP are 5.4 µrad for slopes and 55 nm for heights, these values drop down to 0.21 µrad and 0.98 nm with the ideal parameters (
= 3.26 mrad and q = 128 mm for the focussing distance) the residual errors measured with LTP are 5.4 µrad for slopes and 55 nm for heights, these values drop down to 0.21 µrad and 0.98 nm with the ideal parameters (![]() = 3.233 mrad and q = 128.96 mm). The deviation in respect to the OSAKA metrology is 2 nm PV, and 0.12 nm rms (Figure 145). This excellent agreement suggest that a refined LTP metrology should be able to meet future requirements of nanofocussing optics.
= 3.233 mrad and q = 128.96 mm). The deviation in respect to the OSAKA metrology is 2 nm PV, and 0.12 nm rms (Figure 145). This excellent agreement suggest that a refined LTP metrology should be able to meet future requirements of nanofocussing optics.
Reference
[1] K. Yamauchi, K. Yamamura, H. Mimura, Y. Sano, A. Saito, K. Ueno, K. Endo, A. Souvorov, M. Yabashi, K. Tamasaku, T. Ishikawa, Y. Mori, Rev. Sci. Instrum. 74, 2894-2898 (2003).
Principal Publication and Authors
A. Rommeveaux (a), M. Thomasset (b), D. Cocco (c), F. Siewert (d), SPIE Proc. 5921-20, 117-128 (2005); L. Assoufid (e), A. Rommeveaux (a), H. Ohashi (f), K. Yamauchi (g), H. Mimura (g), J. Qian (e), O. Hignette (a), T. Ishikawa (f,h), C. Morawe (a), A.T. Macrander (e), S. Goto (f), SPIE Proc. 5921-21, 129-140 (2005).
(a) ESRF
(b) Synchrotron Soleil (France)
(c) Sincrotrone Trieste (Italy)
(d) BESSY GmbH (Germany)
(e) APS (USA)
(f) SPring-8/JASRI (Japan)
(g) Osaka University (Japan)
(h) SPring-8/RIKEN (Japan)


