Xenon Chamber
Two different Xenon cells are available to users on MX beamline: the Oxford Cryosystem Xcell and the Rigaku MSC Cryo-Xe-Siter.
Oxford Cryosystem Xcell - mode of operation
-
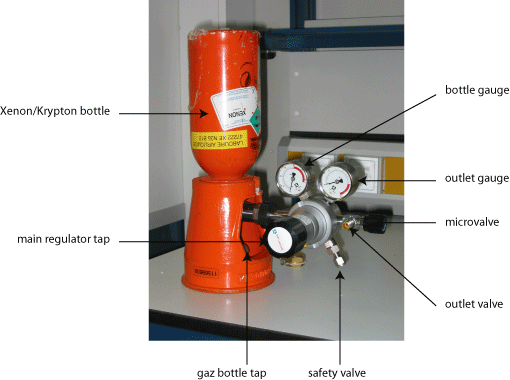
Connect the gaz regulator to the Xenon/Krypton bottle and the Xcell plastic tube (blue) to the gaz regulator outlet valve if not already connected
-
Check the microvalve of the regulator is closed and open the gaz bottle tap
-
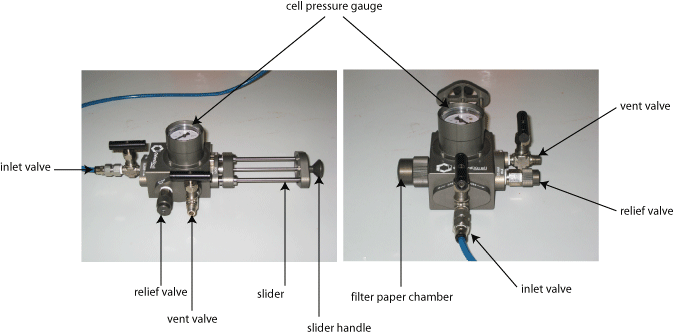
Purge the system by opening the inlet valve for a second while the vent valve is open
-
Open the filter paper chamber where the filter paper will be fitted, Soak the filter paper with mother liquor added with cryoprotectant
-
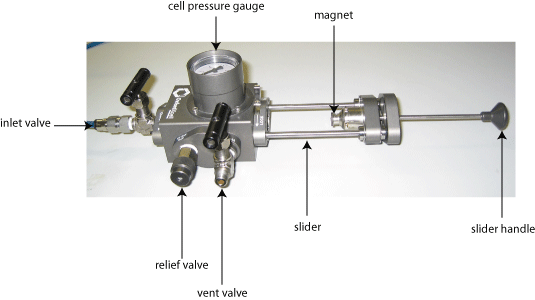
Fit the needed magnet onto the slider depending on the loop system you use ( Oxford Cryosytem or Hampton Research)
-
Fish the crystal out of the drop and soak it in the mother liquor added with cryoprotectant if needed (or straight into oil)
-
Place the loop on the magnet on the slider
-
Slide it in the chamber and lock it
-
Open the inlet valve up to the pressure you want to carry your experiment (pressure gauge)
-
Close the inlet valve. In case you exceed the needed pressure you can adjust carefully with the vent valve
-
Let the crystal under pressure for the rest of the experiment (usually varying between a couple of minutes to a couple of hours)
-
When time is up, open the vent valve (while the inlet valve is closed) and let the pressure going down to atmospheric pressure
-
Unlock the slider, slide the loop out of the chamber
-
Grab the loop and freeze the crystal into nitrogen
Rigaku MSC Cryo-Xe-Siter - mode of operation
-
Connect the gaz regulator to the Xenon/Krypton bottle and the HPLC inlet tube (green) of the Cryo-Xe-Siter to the gaz regulator outlet valve if not already connected
-
Check the microvalve of the regulator is closed and open the gaz bottle tap
-
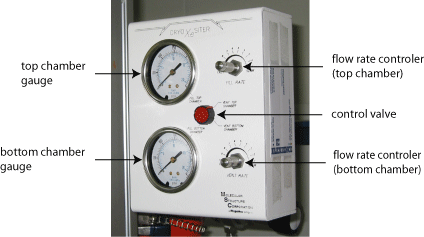
Purge the system by opening the inlet valve for 5 second each while the control valve of the control system is on vent top chamber and then on vent bottom chamber
-
Set the ball valve in the close position
-
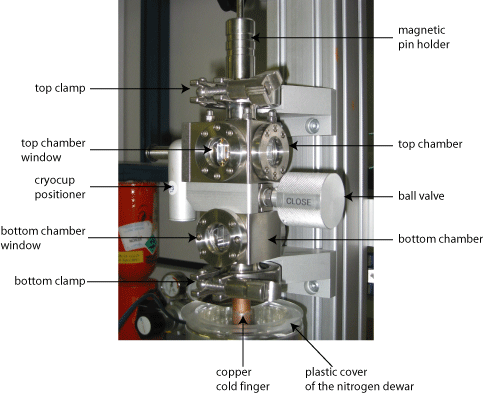
Place 0.100-0.250 ml cryoprotectant in the cryocup and fit it into the copper holder in the top chamber while the cryocup positioner pulls in
-
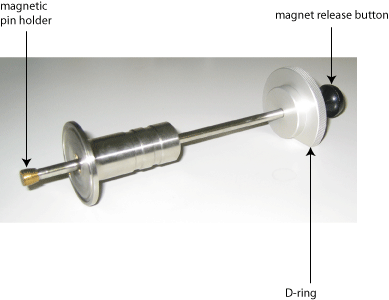
Place the handle is up, fish a crystal out of the drop and soak it into cryo protectant if necessary then place it on the magnetic pin holder
-
Fit the magnetic pin holder into the top chamber and close hermetically with the top chamber clamp
-
Bring the cryocup to the middle of the top chamber with the cryocup positioner pulled in then push down the handle to bring the crystal just above the meniscus of cryoprotectant, thighten the lever brake knob on the left to maintain the handle in position
-
Check the D-ring fits in the slot, set the control valve to fill top chamber. The pressure is adjusted by the gaz regulator microvalve and the fill rate is adjusted by the flow rate controler
-
While the crystal is under pressure, place the copper cold finger (not the gasket) into liquid nitrogen to prechill
-
After prechilling,place the copper cold finger on the dewar in contact with liquid nitrogen (maintaned vertically by the plastic cover), fitted with the cryovial full of carbon tetrafluoride or propane
-
Position the copper cold finger in the bottom chamber and close the bottom clamp
-
Once the time is up, set the control valve on Fill bottom chamber and set the pressure at the same as the top chamber
-
Turn the ball valve to open
-
Raise the handle in order to pull out the cryocup holder using the cryocup positioner
-
Lower the handle down to the bottom stop position and quickly realease the magnet by pushing the magnet release button to freeze the crystal
-
Vent the bottom chamber when the presure dropped to 0 bar open the bottom clamp, raise the dewar down and remove the cryovial from the copper cold finger
