- Home
- Users & Science
- Scientific Documentation
- ESRF Highlights
- ESRF Highlights 2002
- Materials Science
- In situ Microtomography Study of Metallic Powder Sintering
In situ Microtomography Study of Metallic Powder Sintering
Sintering is a thermal treatment, below the melting temperature of the main constituent material, that transforms a metallic or ceramic powder (or a powder compact) into a bulk material containing, in most cases, residual porosity. This is the final step of an industrial powder metallurgy process that allows mass production of complex-shape components. Despite a consistent research activity over the decades, several questions remain open in the field of metal powder sintering (for example the role of particle rearrangement in the densification process, or the causes of anisotropic shrinkage during sintering) [1]. Thanks to the recent development of high-resolution X-ray microtomography, significant advances in the understanding of the phenomena occurring during sintering can now be expected. To investigate highly absorbing materials such as copper or steel and to follow in situ the structural evolution during thermal treatment, we have used the ultra fast micro-tomography setup recently developed at ID15, the High Energy X-ray Beamline. This setup allows one to collect a full 3D dataset in less than one minute. In the present study, the microstructural evolution of a loose copper powder and of a steel powder compact was studied. Both materials were sintered in a furnace in which a mixture of helium and hydrogen (4 at.%) was used to prevent oxidation.
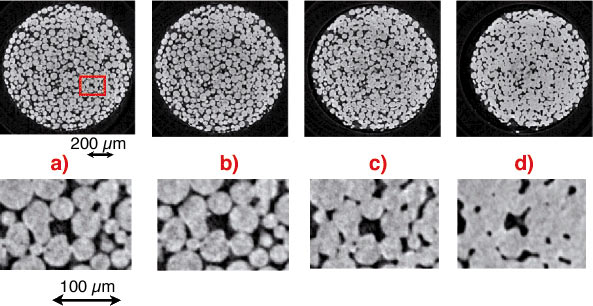
Copper powder was poured in a 1 mm-diameter, 20 mm-high quartz capillary. Four reconstructed slices representing the same section of the sample before sintering and at three different moments of the thermal cycle are shown in Figure 81. The microstructural evolution during sintering can be clearly observed. Initial bonding between particles and neck formation appears at 1000°C but the main evolution occurs between 1000°C and 1050°C when, because of fast neck growth, the particles get closer to each other and the porosity is highly reduced. Finally pore channel closure, rounding, and shrinkage terminate the densification process. The neck growth is better observed in the magnified images.
 |
|
Fig. 81: 2D reconstructions (virtual slices) perpendicular to the cylindrical axis showing Cu particles at different stages of the sintering process: (a) before sintering, (b) after sintering at 1000°C, and (c) after sintering at 1050°C. Identical regions (inside the rectangle of (a)) are shown at a higher magnification below. |
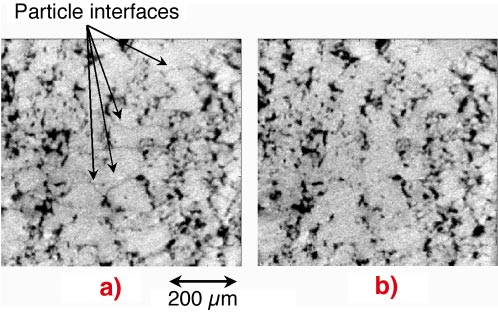
Steel compacts have been obtained by pressing samples into a close die of commercial Distaloy AE powder. Several microtomography scans were recorded at room temperature before and after sintering (see Figure 82). A small (about 1%) and anisotropic shrinkage was observed. Small pores located at the interfaces between particles can be observed before sintering, but disappear afterwards. Since the direction of such visible interfaces is preferentially horizontal, i.e. perpendicular to the direction of compaction, the disappearance of such interfaces during sintering could be the origin of the anisotropic shrinkage observed here.
 |
|
Fig. 82: Reconstructed slices of a compacted Distaloy sample before (a) and after (b) sintering at 1130°C. The direction of prior compaction is along the vertical direction in the paper plane. |
This non-destructive method provides the 3D microstructural evolution of metal powder during sintering. Local and statistical information can be obtained, and will be used in the future for modelling the sintering process. Special attention will be given to the anisotropy induced by prior compaction and to its evolution through sintering.
References
[1] R.M. German, Sintering Theory and Practice, John Wiley and Sons, New York, 1996.
Principal Publication and Authors
O. Lame (a), D. Bellet (a), M. Di Michiel (b) and D. Bouvard (a), European Materials Research Society 2002 Proceedings, to be published in Nuclear Instruments and Methods in Physics Research B.
(a) Laboratoire Génie Physique et Mécanique des Matériaux, Institut National Polytechnique de Grenoble, CNRS UMR 5010, Saint Martin d'Hères (France)
(b) ESRF


